HP LaserJet P1102W Wireless Setup
The HP LasetJet P1102W is an efficient printer which is good for both office environment and for domestic usage. One good thing about this printer is that it is very energy saving, and uses lesser than usual amount for printing. The first step after purchase of this device is to set up the printer. There are different methods of doing this. One can do this by contacting the customer service executives of HP Printer, or by going online on the HP Printer website and following instructions for HP LaserJer P1102W Wirelesss setup.
This will illustrate all the steps to HP Laserjet P1102W Setup printer on a MAC Operating system.
Setting up the HP LaserJet P1102W printer on MAC OS with help of WPS
- For starters you have to see if all your devices necessary are connected to power sources if needed or are switched on. This involved your computer, printer, internet router etc. Or any other device which you are using to connect must be switched on.
- Once you switch on your router, you will have to click on the button which says wireless.
- Now go over to your computer and look for the wireless option within the control panel of this too.
- Once you click on the wireless option, you will see a blinking happening. This is when the Wi-Fi system is being located.
- The printer will soon establish a connection with your router and then the blinking will stabilize. Your printer is now connected to your router once this happens.
- Now you have to head over to your computer and click on the sign which says Apple and then from there go into the button which says Settings within the Apple option.
- Once you have done this, now go into the option which says printers and scanners. A dialog box will be displayed.
- Out of the names of devices given, you have to pick the device you want to establish a connection with.
- Make sure you pick the correct device here.
- After you have done this, then click on ‘add machine’ and then the printer connects to the device.
- You could also run a few rounds to check if it is functioning properly or get a printout of the printer’s settings to determine if it is working properly.
How to setup the HP LaserJet P1102W printer using a USB cable
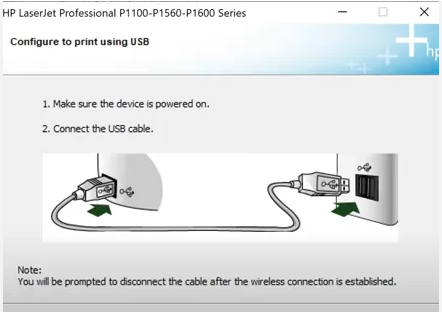
- First make sure that your printer is switched on, connected to the power source etc. and all of the settings of the printer are in order.
- You will have to connect your USB wire to the HP LaserJet P1102W printer and also connect the other end to the MAC computer.
- Once your printer recognizes the USB cable, then you will see a dialog box appear on your window in the computer screen. Follow the steps on the computer screen.
- Now press on the install button which shows and continue following the process.
- You will know that the installation process is complete when a new printing device is visible as added on your computer.
- You can know if the printer settings are in place by running a few test prints, you can also check the settings of the HP LaserJet P1102W printer before starting printing.
Wireless connection with HP LaserJet P1102W printer help of USB wire
- You have to go to the system option within the Apple symbol which is on your MAC screen
- After this, click on the printer setup option. From here move on to the printer utility option.
- Then go over to the wireless option which is available within the Network.
- You will need to come back to find out the name of your network using the SSID option and the wireless option within it.
- Click on the name of the network you want to connect with. Select this and click on apply.
- Now after this, move on to the printers and scanners option and click on add printer. Locate the name of your printer and make sure this is added.
- Now you only have to click on the name of the printer and it will be added. Give it some time, and then make sure you do a few test print runs before you start using the HP LaserJet P1102W printer on your MAC operating system.
Frequently Asked Questions
How To Connect HP LaserJet P1102W On MAC OS Using WPS?
To connect the HP LaserJet P1102W to a MAC OS using WPS (Wi-Fi Protected Setup), follow these steps:
1. Ensure that your HP LaserJet P1102W printer is turned on and in a ready state.
2. On your MAC, navigate to the Wi-Fi settings. You can find this in the menu bar at the top-right corner of your screen.
3. Locate and select the WPS option in the Wi-Fi settings menu.
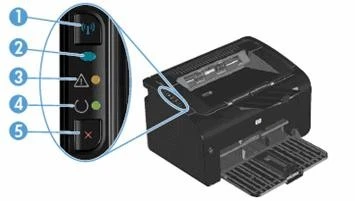
4. Press the WPS button on your HP LaserJet P1102W printer. The location of the WPS button may vary, so refer to your printer’s manual for its exact location.
5. The MAC OS will now attempt to connect to the printer using WPS. This process may take a few moments.
6. Once the connection is established, your MAC will be connected to the HP LaserJet P1102W wirelessly via WPS.
Note: It’s important to consult the printer’s manual for specific instructions related to your model, as the location of the WPS button and the exact steps may vary.
How to install wireless printer HP LaserJet P1102w?
To install the HP LaserJet P1102w wireless printer:
1. Power on the printer and place it within the Wi-Fi range.
2. On your computer, go to Settings, select Devices or Printers.
3. Choose “Add Printer” and select the HP LaserJet P1102w from the list.
4. Follow on-screen instructions to complete the wireless setup.
5. Once connected, print a test page to ensure successful installation.
How do I reset my HP LaserJet P1102w wireless settings?
To reset HP LaserJet P1102w wireless settings:
1. Press and hold the Wireless button on the printer until the light blinks.
2. Release the button when it blinks faster.
3. The wireless settings are now reset to default. Reconfigure the connection as needed.
Hp laserjet p1102w wireless setup mac not working
If HP LaserJet P1102w wireless setup on Mac is not working:
1. Ensure the printer is powered on and within Wi-Fi range.
2. Restart both the printer and your Mac.
3. Check Wi-Fi credentials and reconnect.
4. Update printer firmware and Mac software.
5. If issues persist, consult HP support or refer to the printer manual.
How to connect using Wi-Fi Protected Setup (WPS)?
To connect using Wi-Fi Protected Setup (WPS):
1. Press the WPS button on your router.
2. Within 2 minutes, press the WPS button on your device.
3. The devices will automatically establish a secure Wi-Fi connection.
Also Read :