In today’s technology-driven world, a seamless wireless connection is essential for virtually any device, and your Brother printer is no exception. Liberate yourself from the shackles of cables and embrace the convenience of wireless printing, opening up a realm of effortless printing possibilities.
This guide, meticulously crafted for the tech-savvy people, and it will meticulously guide you through the steps to establish a seamless WiFi connection for your Brother printer, regardless of whether you’re using a laptop, Windows 10, or even your smartphone.
Additionally, we’ll delve into the Brother printer setup wizard for added convenience.
In this article we will also provide information on following topics
- How to connect Brother printer to WiFi without cable
- Connect Brother printer to laptop wirelessly
- Brother printer setup wizard for seamless connectivity
Understanding the Essentials
Before we delve into the step-by-step process of connecting your Brother printer to Wi-Fi, it’s crucial to familiarize yourself with the essentials. Ensure that you have the following elements in place.
Network Credentials: Wi-Fi Network Name (SSID): This is the name of your wireless network. It is often a combination of letters and numbers, and it can be found in your router’s settings or on a sticker attached to your router.
Wi-Fi Password: This is the password that protects your wireless network. It is typically a combination of letters, numbers, and symbols, and it is set up when you first install your router.
Verify Wi-Fi Capabilities: Confirm that your Brother printer is equipped with Wi-Fi functionality. Refer to your printer’s manual or specifications for detailed information on its wireless capabilities.
Optimizing Wi-Fi Range for Your Brother Printer: Position your Brother printer strategically to enhance its wireless connection. Ideally, place your Brother printer within 30 feet of your Wi-Fi router for optimal signal strength. Assess your printer’s Wi-Fi signal strength. If it’s robust, you might extend the distance beyond 30 feet.
How to Connect a Brother Printer to a Laptop?
Step 1: Power Up Your Brother Printer: The initial step involves powering on your Brother printer. Allow it sufficient time to initialize completely and ensure it’s in a ready state.
Step 2: Access the Control Panel: Navigate to your printer’s control panel using the available touchscreen or buttons, depending on your Brother model. Look for the “Menu” or “Settings” option.
Step 3: Navigate to Network Settings: Once in the menu, navigate to the “Network” or “LAN Settings” section. The specific wording may vary slightly depending on your Brother printer model.
Step 4: Choose Wireless Setup: Locate the “Wireless Setup” or “WLAN” option and select it. This will initiate the process of connecting your Brother printer to your WiFi network without the need for any cables.
Step 5: Select Your WiFi Network: Your Brother printer will now display a list of available WiFi networks. Locate and select your network from the list.
Step 6: Enter WiFi Credentials: Once you have selected your WiFi network, you will be prompted to enter your WiFi password. Carefully input your network password using the on-screen keyboard. Make sure to enter the password correctly, as any errors will prevent the connection from being established.
Step 7: Confirm Settings: After entering your WiFi password, thoroughly review the settings to ensure they are accurate. Once you have confirmed that the information is correct, proceed to initiate the wireless connection.
Step 8: Print a Network Configuration Report: To verify a successful wireless connection, you can print a network configuration report directly from your Brother printer. This report provides detailed information about the printer’s network settings, including its IP address.
Connecting Your Brother Printer to a Laptop or Windows 10 Device Using the Brother Printer Setup Wizard
Whether you’re a seasoned user or configuring your Brother printer for the first time, this wizard serves as your gateway to seamless connectivity and peak performance. It sets up your printer in minutes, saving you valuable time allows you to enjoy optimal performance with automatic driver configurations.
Also Read :- Connect Your Brother Printer to the Wireless Network
Also Read :- How Can I Fix Brother Printer Error A5
How to Connect WiFi to Brother Printer Windows 10
If you are also seeking answers to the above questions then Brother Printer setup Wizard can definitely help you. All you need to do is follow these simple steps
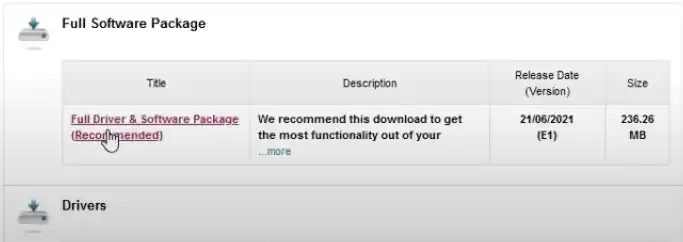
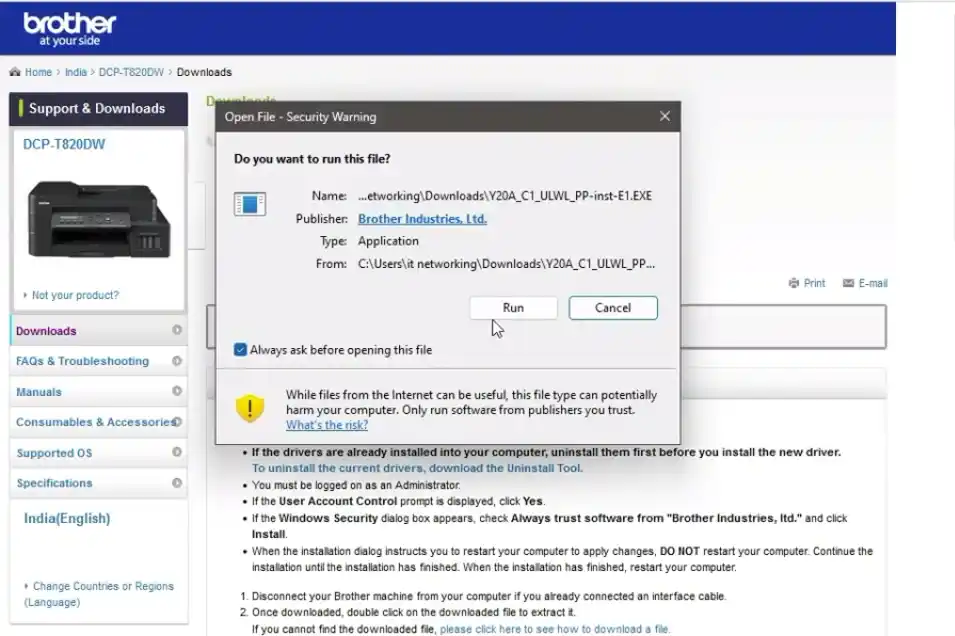
Step 1: Install the Brother Printer Drivers: Begin by obtaining the Brother printer drivers either from the installation CD that came with your printer or by downloading them directly from the official Brother website.
Step 2: Launch the Brother Printer Setup Wizard: Once you have the drivers, locate and launch the Brother printer setup wizard. Follow the on-screen instructions carefully to proceed with the installation.
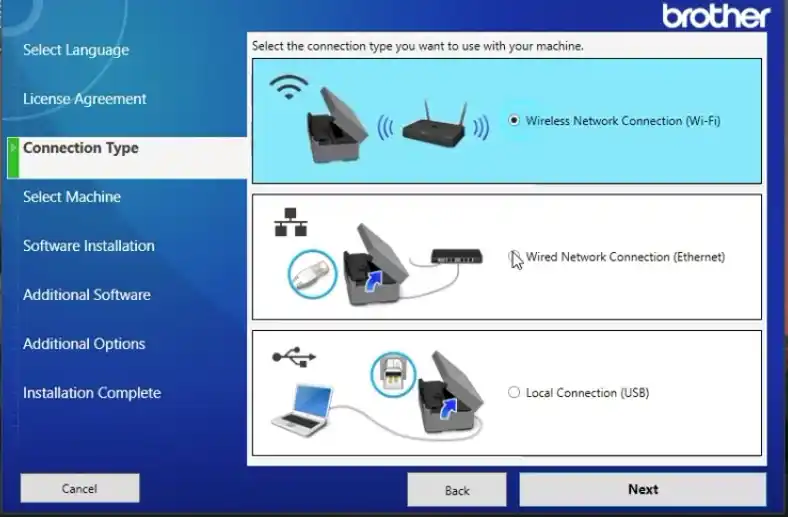
Step 3: Choose the Wireless Connection Option: During the installation process, the wizard will prompt you to select a connection method. Choose the “Wireless” option to establish a wireless connection between your Brother printer and your laptop or Windows 10 device.
Step 4: Complete the Installation: Continue following the on-screen instructions to complete the installation process. Ensure that your Brother printer remains powered on and connected to the same WiFi network as your laptop or Windows 10 device.
How to Connect Brother Printer to Phone
Connecting Brother printer to phone is a straightforward process:
Ensure Network Connectivity: Make sure that your smartphone is connected to the same WiFi network as your Brother printer.
Install the Brother iPrint&Scan App: Download and install the Brother iPrint&Scan app from the appropriate app store.
Launch the iPrint&Scan App: Once the app is installed, launch it on your smartphone. The app will guide you through the setup process.
Select Your Brother Printer: The iPrint&Scan app will scan for nearby Brother printers. Locate and select your Brother printer from the list of available devices.
Complete the Setup: Follow the on-screen instructions carefully to complete the setup process.
Conclusion
Connect your Brother printer wirelessly with ease using these instructions for laptops, Windows 10, and phones. Enjoy the freedom of wireless printing in your home or office. Utilize the Brother Printer Setup Wizard for added convenience and confidently navigate the world of wireless printing. Happy printing!
People Also Ask
How do I connect my printer to Wi-Fi?
To connect your printer to Wi-Fi, follow these steps:
1. Power on your printer.
2. Access the printer’s settings or menu on the control panel.
3. Choose the “Network” or “Wireless Setup” option.
4. Select your Wi-Fi network from the list.
5. Enter your Wi-Fi password.
6. Confirm the settings and complete the connection.
How do I reset my Brother printer to Wi-Fi?
To reset your Brother printer’s Wi-Fi settings:
1. Press the “Menu” button on the printer.
2. Navigate to “Network” or “LAN.”
3. Choose “Reset Network” or a similar option.
4. Confirm the reset.
5. Reconnect your printer to Wi-Fi using the setup process.
How do I get my Brother printer to automatically connect to Wi-Fi?
To make your Brother printer automatically connect to Wi-Fi:
1. Access the printer menu.
2. Navigate to “Network” or “Wireless” settings.
3. Enable “Auto Connect” or a similar option.
4. Save the changes. Now, your Brother printer will automatically connect to Wi-Fi on startup.
Why is Brother printer not connecting to Wi-Fi?
Possible reasons why a Brother printer may not be connecting to Wi-Fi:
1. Incorrect Wi-Fi credentials entered.
2. Signal interference or weak Wi-Fi signal.
3. Outdated printer firmware.
4. Network configuration issues.
5. Printer and router not on the same frequency band.
6. Temporary connectivity issues.
How do I reset my Brother network settings?
To reset Brother network settings:
1. Press the “Menu” button on the printer.
2. Navigate to “Network” or “LAN” settings.
3. Select “Factory Reset” or “Network Reset.”
4. Confirm the reset.
5. Reconfigure network settings as needed.
Why isn’t my wireless printer connecting?
Possible reasons for wireless printer connection issues:
1. Incorrect Wi-Fi credentials.
2. Weak signal or interference.
3. Network problems or distance.
4. Frequency band mismatch.
5. Firewall/security settings.
6. Outdated software/firmware.
7. Troubleshoot by checking credentials, improving signal, and updating software.
What is the network key for Wi-Fi?
The network key for Wi-Fi is the password or security key required to access a wireless network.
